Showing posts with label Materials. Show all posts

March 6, 2013

Upholstering An Ottoman

I decided the other night (at 9:30p.m./ bless the hubs little heart) that I wanted to rearrange the living room a little. Our sofa was an "L" shape, one side having a chaise lounge. And with a baby swing and bouncer next to the end of the chaise, we had about one foot of space to get at our dining table. Not convenient. Luckily, our Ikea sofa allows us to remove the end of the sofa so that's exactly what we did. Here is our sofa in its original formation:
And here is what it looks like now...
Because our Little Miss is well on her way to darting around the house, I wanted our "coffee table" to be safe for her, functional us, and nice to look at. Since our new ottoman was part of the sofa, it already had legs and was somewhat padded. Here is the end result of transforming this could-be useless piece into a conversation starter: (So happy!)


The very first thing I did was iron my fabric just to work out all those ugly creases. I used a high heat setting because my fabric was made of 100% cotton. (Always check what the fabric is made of before ironing!)
I wanted to add more padding not only to fill out the ottoman more on top, but also to protect Maddy. Laying the batting out flat on the floor, I placed the ottoman in the center, making sure that all sides wrapped around.


And those funny looking legs? Those are temporary until I can find ones I like! Pulling tightly, I made my way around the floor, stapling as I went. The staples are about 2 inches apart. I folded the corners as I would a present, again pulling tightly so it's not excessively bulky. I then trimmed the excess batting so it would not interfere with the legs.


After all of my stapling was complete for the batting, I flipped the ottoman over to make sure the top looked good and wasn't wrinkled.


Then it was time for the fabric! I decided to purchase outdoor quality fabric because it still felt soft, but it would be slightly more durable with the kiddos. Laying that flat on the floor, just like I did with the batting, I placed the ottoman in the center and made sure that all sides of the fabric wrapped around the sides of the ottoman. Starting with one side, I pulled the fabric tight and stapled the fabric across the inside of the ottoman about 3 inches from each end. After stapling the first side, I moved to the opposing side of the ottoman and began to staple there. Eventually, all the sides were then stapled.


The corners I had to play with in order to get the right fold so the fabric wasn't bunched looking. I folded the corners similar to how I folded the batting. Then I stapled the crap out of it so the fabric would not come loose over time. Finishing all the corners, my ottoman is complete! I screwed the temporary legs back in and until I find new ones, those will have to do.


A look again at the finished product. I really like it and it looks like Little Miss does too!

  
Budget Breakdown:
Fabric from Joann's: 60% off sale made the fabric $6.99/yard = $15.00
Batting: $6.99
Ottoman base: already owned
Ottoman feet: already owned
Staple gun w/ staples: $12.00

Total Cost: $33.99


March 4, 2013

The Little House Is Blossoming

We are incredibly excited to announce that we are on the hunt for our first home! This has been a long awaited moment for our family and we are absolutely itching to get out there and look. The hubs and I sat down to discuss what our "must-haves" and "could-haves" for our house would be. Now, this is where we are starting to realize some big differences between us. It doesn't matter how long you've known someone, it's still a shock to see your spouse's "house side". *wink*

Our positively must haves:
  • 3 bedrooms
  • 1.5 baths
  • Garage (detached or attached)
  • Basement
  • Appliances (Fridge, Stove, Washer/Dryer)
Things we wouldn't mind having:
  • Laundry located on the first floor
  • Wood floors
  • Mudroom
  • Fenced yard (for those kiddies and our future pooch)
These lists are simple yes, but the discussion around them has been anything but! The hubs actually prefers a yard that's not fenced and is HUGE. As long as it's private, he seems to think no fence is okay. I'll admit, I like the idea of the yard being enormous and private, maybe backed up to a wooded area? That would be great for all those BBQ's we're planning to throw. But what about our water bill? Yikes. Hubs also feels like we don't really need a basement as long as the storage within the house is enough. I feel like I'd like one not only for storage, but just in case we have a real bad storm brew up, we all have a safe place to hide. But I understand where he is coming from. We may not find a home with a basement because of the style we're looking for. We won't know what we're in for until we get out there. The good thing? We agree on the really important stuff and he's my bestie, so we'll work it out!

Being mentally house crazed, I've been on Pinterest pretty much 23/7. Yes, that's one hour of sleep you see there. I'd love to share a few ideas we'd love for our new home. They aren't in any particular order or category, just a few things we love.

 {source}

How cool is this flooring? This is ceramic tile made to look like wood planks. LOVE for our bathroom. We'd love to have wood flooring throughout our home too, even if it's laminate made to look like wood. Plank style laminate would give us better durability with kids and pooches running around. 

{source}

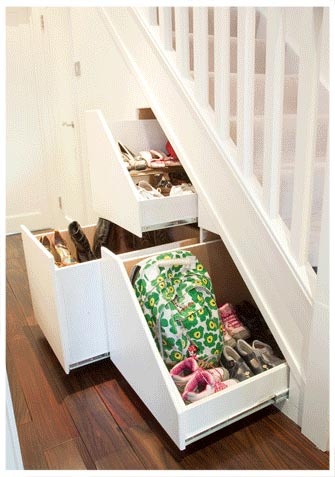
 If we have stairs anywhere in our home, this business is happening. What an awesome and functional way to store belongings. I can't get over how much happiness this idea brings me. The piles of blankets and dozens of board games are now tucked away, but easily accessed.

 
{source}

One of my favorite rooms in a house is an organized mudroom. The function of this space is great for kids, teaching them cleanliness, organization, and to pick up after themselves. This area would be amazing for the entire family, keeping all our shoes, bags, coats and winter items stored away. It brings such character into a home too.

{source}

I cannot stand stacking my baking dishes and baking sheets. What's better than keeping them standing upright and separate? So very excited to be putting something like this in our cabinets. It will be so much better than our hott mess of a baking cabinet now! (It's so bad, I don't have the heart to show you)

{source}

Lovely. My one word definition of this space. It's open and airy, but so welcoming and intimate. I am digging the country style here and the differently colored (moveable!) kitchen island. Check out the apron sink too. Adore. Open shelving is a current trend that allows the top half of your kitchen to not feel so heavy. Shelves would be a great place to store everyday dishes and glasses as well as pops of fun color. 


{source} 

This is my version of a fresh office. The crisp whites and touches of metallic are calming but oh so glamorous. Such an organized space. I can just feel the amount of work getting done in here.

{source}

This tote can be used for anything. In the mudroom, Little Miss' room, the office, my closet. I plan to get myself a few of these to use around the house. Slap a label on it and I'll have color and pattern in my room. Bam.

{source}

If you're anything like me, the wrapping paper is in one place, the ribbon in a drawer in the basement, and the tape somewhere between the office and kitchen. This over the door storage spot is the mecca of wrapping stations. Cards, tissue, ribbons, paper, tape...whoa! All in the same place. Imagine that. 

{source}

Last and certainly not least, these delightful little seating arrangements. I bet I can find them at our local thrift shop (popping tags) and jazz them up just like these. Such a fun solution for seating at all our BBQ's! The great thing about painting them is that if you ever change your mind about the color, just spray another one on. 

The list could go on forever. But I promise to keep you fully updated on our progress. We are so excited to start this journey and can't wait to start sharing our transformations with you all. I'd love for you to share your first home experiences too!