Showing posts with label Design. Show all posts

March 25, 2013

Favs on Pinterest

It's been a while since we posted last...our Little Miss has been very under the weather. And while I love blogging, I love snuggling with my girl a whole lot more. So, while we're hanging out on the couch again today, I thought I'd share a few things I'm digging on Pinterest (as you'll see, there is no method to the madness). We're still in the middle of an insane in the membrane house search so obviously that's all I look at nowadays! Enjoy..


 {source}


These are just a few of my favs right now via my pinning of interests. Hopefully you'll run across some cool finds too..I'd love for you to share them too! 


March 7, 2013

FREE Spice Storage

We have a ton of baby food jars left over from Maddy's food lying around the house here. And instead of pitching them (well, recycling really), I wanted to make use of them for our spice storage. This way, the storage will be uniform and I can eventually make cute labels for them. The cupboards were a complete disaster to say the least. We always struggled to find the spices we needed, especially the tiny ones that seemed to float to the back abyss of the cupboard.


Forgive the chipboard, brown (ugliness). Straight out of the 70's those are. I had $0.00 for my budget this time around so it was time to rummage the house for left over boxes. I found two cereal boxes that we were throwing away and since they were the same width, it was decided that these would make a great riser for our cupboards.  Risers at stores and online can be found for inexpensive prices, but use what'cha got, right?


I measured 4" for the first height, 3" for the second and 1" for the third and shortest "step" (Oops Alert: I totally measured that last step one inch too short) . Cutting the boxes hot dog style, they ended up pretty straight. It helped me to just measure and draw a line around the entire box. I pasted the cut-outs together with Mod Podge and just to cover that cereal box beauty, I slapped some craft paint on them. The paint and Mod Podge also did a nice job of hardening the cardboard for better stability.


Eventually, I plan to convert all my spices into baby food jars or another variety of small glass jar with a more permanent label attached to them. I will feel much more motivated when I can put these beauties in their rightful place in our new home! But, for now, this is a great storage solution and it's a heck of alot better than what it was before.


Ah...much better!


March 6, 2013

Upholstering An Ottoman

I decided the other night (at 9:30p.m./ bless the hubs little heart) that I wanted to rearrange the living room a little. Our sofa was an "L" shape, one side having a chaise lounge. And with a baby swing and bouncer next to the end of the chaise, we had about one foot of space to get at our dining table. Not convenient. Luckily, our Ikea sofa allows us to remove the end of the sofa so that's exactly what we did. Here is our sofa in its original formation:
And here is what it looks like now...
Because our Little Miss is well on her way to darting around the house, I wanted our "coffee table" to be safe for her, functional us, and nice to look at. Since our new ottoman was part of the sofa, it already had legs and was somewhat padded. Here is the end result of transforming this could-be useless piece into a conversation starter: (So happy!)


The very first thing I did was iron my fabric just to work out all those ugly creases. I used a high heat setting because my fabric was made of 100% cotton. (Always check what the fabric is made of before ironing!)
I wanted to add more padding not only to fill out the ottoman more on top, but also to protect Maddy. Laying the batting out flat on the floor, I placed the ottoman in the center, making sure that all sides wrapped around.


And those funny looking legs? Those are temporary until I can find ones I like! Pulling tightly, I made my way around the floor, stapling as I went. The staples are about 2 inches apart. I folded the corners as I would a present, again pulling tightly so it's not excessively bulky. I then trimmed the excess batting so it would not interfere with the legs.


After all of my stapling was complete for the batting, I flipped the ottoman over to make sure the top looked good and wasn't wrinkled.


Then it was time for the fabric! I decided to purchase outdoor quality fabric because it still felt soft, but it would be slightly more durable with the kiddos. Laying that flat on the floor, just like I did with the batting, I placed the ottoman in the center and made sure that all sides of the fabric wrapped around the sides of the ottoman. Starting with one side, I pulled the fabric tight and stapled the fabric across the inside of the ottoman about 3 inches from each end. After stapling the first side, I moved to the opposing side of the ottoman and began to staple there. Eventually, all the sides were then stapled.


The corners I had to play with in order to get the right fold so the fabric wasn't bunched looking. I folded the corners similar to how I folded the batting. Then I stapled the crap out of it so the fabric would not come loose over time. Finishing all the corners, my ottoman is complete! I screwed the temporary legs back in and until I find new ones, those will have to do.


A look again at the finished product. I really like it and it looks like Little Miss does too!

  
Budget Breakdown:
Fabric from Joann's: 60% off sale made the fabric $6.99/yard = $15.00
Batting: $6.99
Ottoman base: already owned
Ottoman feet: already owned
Staple gun w/ staples: $12.00

Total Cost: $33.99


March 4, 2013

The Little House Is Blossoming

We are incredibly excited to announce that we are on the hunt for our first home! This has been a long awaited moment for our family and we are absolutely itching to get out there and look. The hubs and I sat down to discuss what our "must-haves" and "could-haves" for our house would be. Now, this is where we are starting to realize some big differences between us. It doesn't matter how long you've known someone, it's still a shock to see your spouse's "house side". *wink*

Our positively must haves:
  • 3 bedrooms
  • 1.5 baths
  • Garage (detached or attached)
  • Basement
  • Appliances (Fridge, Stove, Washer/Dryer)
Things we wouldn't mind having:
  • Laundry located on the first floor
  • Wood floors
  • Mudroom
  • Fenced yard (for those kiddies and our future pooch)
These lists are simple yes, but the discussion around them has been anything but! The hubs actually prefers a yard that's not fenced and is HUGE. As long as it's private, he seems to think no fence is okay. I'll admit, I like the idea of the yard being enormous and private, maybe backed up to a wooded area? That would be great for all those BBQ's we're planning to throw. But what about our water bill? Yikes. Hubs also feels like we don't really need a basement as long as the storage within the house is enough. I feel like I'd like one not only for storage, but just in case we have a real bad storm brew up, we all have a safe place to hide. But I understand where he is coming from. We may not find a home with a basement because of the style we're looking for. We won't know what we're in for until we get out there. The good thing? We agree on the really important stuff and he's my bestie, so we'll work it out!

Being mentally house crazed, I've been on Pinterest pretty much 23/7. Yes, that's one hour of sleep you see there. I'd love to share a few ideas we'd love for our new home. They aren't in any particular order or category, just a few things we love.

 {source}

How cool is this flooring? This is ceramic tile made to look like wood planks. LOVE for our bathroom. We'd love to have wood flooring throughout our home too, even if it's laminate made to look like wood. Plank style laminate would give us better durability with kids and pooches running around. 

{source}

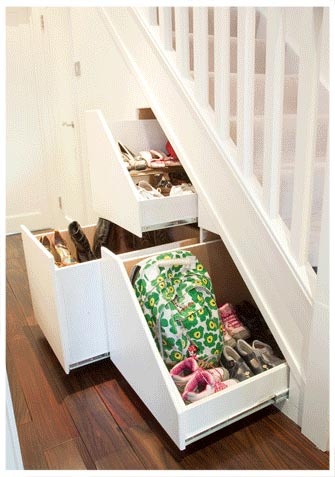
 If we have stairs anywhere in our home, this business is happening. What an awesome and functional way to store belongings. I can't get over how much happiness this idea brings me. The piles of blankets and dozens of board games are now tucked away, but easily accessed.

 
{source}

One of my favorite rooms in a house is an organized mudroom. The function of this space is great for kids, teaching them cleanliness, organization, and to pick up after themselves. This area would be amazing for the entire family, keeping all our shoes, bags, coats and winter items stored away. It brings such character into a home too.

{source}

I cannot stand stacking my baking dishes and baking sheets. What's better than keeping them standing upright and separate? So very excited to be putting something like this in our cabinets. It will be so much better than our hott mess of a baking cabinet now! (It's so bad, I don't have the heart to show you)

{source}

Lovely. My one word definition of this space. It's open and airy, but so welcoming and intimate. I am digging the country style here and the differently colored (moveable!) kitchen island. Check out the apron sink too. Adore. Open shelving is a current trend that allows the top half of your kitchen to not feel so heavy. Shelves would be a great place to store everyday dishes and glasses as well as pops of fun color. 


{source} 

This is my version of a fresh office. The crisp whites and touches of metallic are calming but oh so glamorous. Such an organized space. I can just feel the amount of work getting done in here.

{source}

This tote can be used for anything. In the mudroom, Little Miss' room, the office, my closet. I plan to get myself a few of these to use around the house. Slap a label on it and I'll have color and pattern in my room. Bam.

{source}

If you're anything like me, the wrapping paper is in one place, the ribbon in a drawer in the basement, and the tape somewhere between the office and kitchen. This over the door storage spot is the mecca of wrapping stations. Cards, tissue, ribbons, paper, tape...whoa! All in the same place. Imagine that. 

{source}

Last and certainly not least, these delightful little seating arrangements. I bet I can find them at our local thrift shop (popping tags) and jazz them up just like these. Such a fun solution for seating at all our BBQ's! The great thing about painting them is that if you ever change your mind about the color, just spray another one on. 

The list could go on forever. But I promise to keep you fully updated on our progress. We are so excited to start this journey and can't wait to start sharing our transformations with you all. I'd love for you to share your first home experiences too! 


February 18, 2013

Love Starts In The Kitchen

I've been in the mood lately for all things Kitchen. Everything from storage containers to pretty drawer liners to funky colored equipment. If I could have my dream kitchen right now, it would have every one of these products in it. Can you imagine bright and fresh white cabinetry with black soapstone countertops? Then add in these brilliant pops of color. Adore. Here's a holla to the coolest Kitchen gadgets around:


 |1|2|3|4|5|6|7|8|9|10|11|

  1.  My Kitchen would not be the same without my KitchenAid Mixer. I love to bake and this tool has been my best friend in doing so. My hubs sure appreciates it when I get to make him his favorite cookies. KitchenAid has been coming out with wild and bright colors and I cannot put into words how in love I am with them! 
  2. These jars are just too cute with their chalkboard label. Need to change what's inside? Just erase the label. They are so functional and classic and would look amazing sitting out on your counter. 
  3. Made by the same brand as the sugar jar, these salt 'n' pepper shakers are irresistible. I love the simplicity of the letters "P" and "S". These are modern because of the type font, but classic because of their detail.
  4.  These bakeware items come in several fun colors and double as great serving dishes. I can picture these at a fiesta themed party. Wouldn't these also look great behind glass cabinet doors? 
  5. Another fun server, this tray brings life into your kitchen! Not only would this work in your kitchen, but it could also work on top of an ottoman in your living room, or as a piece of artwork in your bedroom. 
  6. This beautiful pitcher has fun detail and because it's glass, the color of the drink will also add a new level of festivity to your party. How nice would this be with pink lemonade or green tea inside?   
  7. A yellow, happy blender. Need I say more? We love to use our blenders for smoothies, food prep, milk shakes,  and so many other things that make us happy people. Why not make your blender happy too?
  8. Forgive the terrible picture, but this spoon makes me smile. The face of the spoon actually has a face on it! Anything to keep you smiling while making dinner. And the color is marvelous. 
  9. We have plenty of bright colors in this collection of Kitchen items, but adding pattern may be even better. I love polka dots and found this frying pan to be a very positive addition.
  10. Yes. You read this mug correctly. For some, this may be vulgar. But I think this is stinkin' hilarious. Admit it y'all. You have great bathroom breaks after that first cup in the morning. And really, what's the heart of the home without a little humor?
  11. Last, but certainly not least, the amazing Kohler apron front sink. This is just one of many beautiful colors that would definitely bring a sense of brilliance to any Kitchen. It's unexpected and therefore a conversation starter. I, for one, would not mind cleaning my dishes in this pretty little thing. 
These are just a few items I think would add so much fun to a Kitchen space. I will be adding a few of these to our Kitchen and I hope that will be soon!  

February 1, 2013

Baby Proofing

She is officially on the move. And fast.
We had decided a while back that we had to get our behinds moving on baby proofing the house before Maddy started sprinting around. It still felt early to be doing such things, but it's really never too early to make your house safe, right? As first-time parents, the idea of baby proofing seemed completely daunting which is why we probably put it off for as long as we did! Here are some things we realized along the way:
  1. Yes, they say this in all the baby books you'll find, but do get down at Baby's level and crawl around (the whole house). You'll see differently at that level and you'll most likely find things to proof you otherwise wouldn't have.
  2. Think Baby. They will get into everything. Anything that hangs, flashes, makes noise, is shiny, opens, closes...the list goes on. That placemat you have on your table with the vase of flowers/cup of hot coffee on top? Baby will swipe that right off the table while you're trying (unsuccessfully) to get her strapped into her high-chair. Fail.
  3. There is such a thing as overkill. We felt like we didn't want to raise Maddy in a padded room just so she would never get a boo-boo. Our babies, as much as we love and smooch them up, will get lots of bumps and bruises. So go ahead, remove that table cloth and wind up those blind cords. For us, it is not the end of the world if we miss a few furniture edges.
  4. Baby proofing seems to be a never ending process. Maddy is learning to move around so well and get into new things each day. When we think we're good, we realize what else needs to be proofed!
The first thing we did was go around our home and cover every outlet with plastic plugs, designed so little fingers find it difficult to get them out. If there were any outlets above counter top level, we opted to not cover them because even when Maddy can stand, they are too high for her to reach (we'll eventually be covering them).


We have blinds for window coverings and unfortunately, we can't remove them because of our apartment living status. We found these great circles that you can twist and the cord is wrapped on the inside, shortening it. For the metal beaded cords, well, they don't wind up so well so we just gathered the end up and clicked the unit shut.


Our TV is a flat screen that does have a pretty wide base on it, but we were still nervous about it toppling over onto Maddy if she yanked on it. We purchased two heavy duty straps that could be bolted into both the back of the TV and the stand. The straps can be adjusted in length so if the TV needs to be turned at an angle then it can.


We have a tall bookcase along side our TV stand that can very easily be pulled over. We used Mommy's Helper Furniture Brackets to mount it to the wall. One bracket is screwed into the wall and the other to the back of the bookcase. Then a heavy duty zip tie is put through both brackets and closed.


Our Kitchen/Bathroom cabinets do not have hardware on the outside of them and we also cannot damage the doors (ie. mount door catches on the interior of the door). So, with a helpful hint from my mom, we opted to place Command hooks of medium strength on the outside of the cabinets we needed to keep shut. Then, we placed locks over the knobs. The medium strips can hold the weight of 5 lbs and we thought this would suffice for Maddy until we have our own cabinets.


It is amazing how fast Maddy is catching onto to being mobile. While she is this little and still learning what "no" means, we will proof and proof some more. Eventually she will be old enough to understand what we can touch and shouldn't touch. But then we'll be so, so sad that she is not our tiny Little Miss anymore!